Built a new reloading bench

A place to discuss calibers, ammunition, and reloading

Built a new reloading bench

Postby Seismic Sam on Fri Feb 17, 2017 6:13 pm

I got into reloading in about 1973, and built a bench out of pine 2 x 12's and Unistrut bolted together. It didn't look like much, but it stayed in a closet or the basement for the next 40 years until I moved South. There are NO basements in Louisiana, so it was going to be in plain sight in "the Man Cave". As such, I needed a heavy duty bench that actually looked half decent.

The top is a 1 3/4" thick solid core door, and it's pretty easy to tell the difference. An average hollow core door weighs maybe 15 - 20 pounds, while a solid core door weighs 80 - 90 lbs. Some doors are made out of actual lumber inside, while the cheaper ones are a mixture of wood fibers and glue that is HEAVILY compressed together inside the outer lumber veneers. I got the latter, seeing as it was impossible to find the former, and it seems to have worked out quite well. In addition, it only cost me $55 at Home Depot, which is NOT the lowest price retailer you can find.

I had wanted to use wood 4x4's for the bench legs, but I could not figure out how to hold them to the top with rock solid stability, so I got the following steel table legs which also had knock-outs for electrical outlets.

http://www.globalindustrial.com/p/work-benches/components/legs-shelves/adjustable-height-27-7-8-to-35-3-8-leg-30-benches-2

After I cut the door to a 32" x 60" size, I finished it with some stain and put about 5 coats of satin polyurethane varnish over the top. I did NOT take special care trying to produce a streak-free finish! The reason for this is that after the varnish dried, I wet sanded the top with grade 220 Wetordry sandpaper and boiled linseed oil. It's messy, but the result is a dead smooth finish, and boiled linseed oil cures up just like varnish, except it takes longer. The advantage to this is that if the top gets dirty or scratched, you can just go over it again with more 220 grit and boiled linseed oil to renew the surface. :grin:

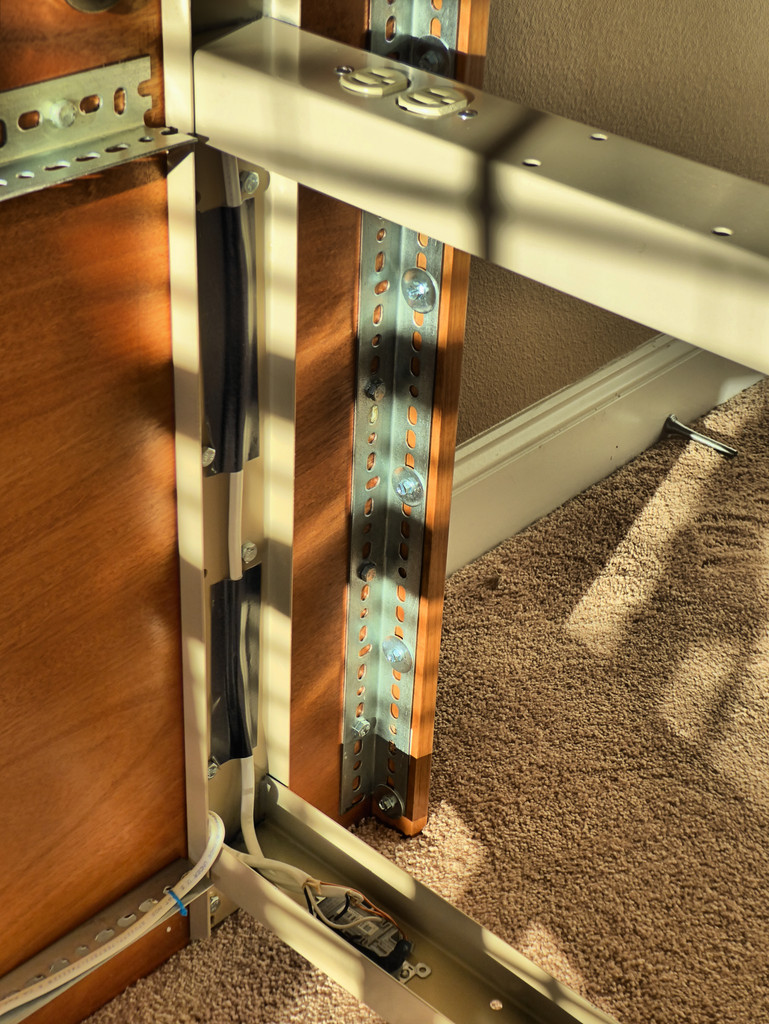
I used slotted steel angle to stiffen up the top on the underside, and also to provide a way to put on the side boards without any hardware showing. Shown below is a picture of the underside of the bench, and the slotted steel angle and the table legs are bolted to the top with 5/16" x 1" steel lag screws. To get the maximum strength bond between the top and the legs/angle, you need to drill holes about half the major diameter of the screw 3/4" deep in the underside of the top.

The next step is torqueing down the lag screws, and you want to do this with a torque wrench. You can figure out how many ft-lbs of torque you need by picking a torque value where the tightening force is STILL CLEALY INCREASING. What you are trying to avoid is torqueing the screws too hard, so that the holding force starts to go back down because the screw threads have started to strip the wood out of the holes! In my case, 10 ft-lbs was the value that I selected.

The underside of the bench is shown below:

Image

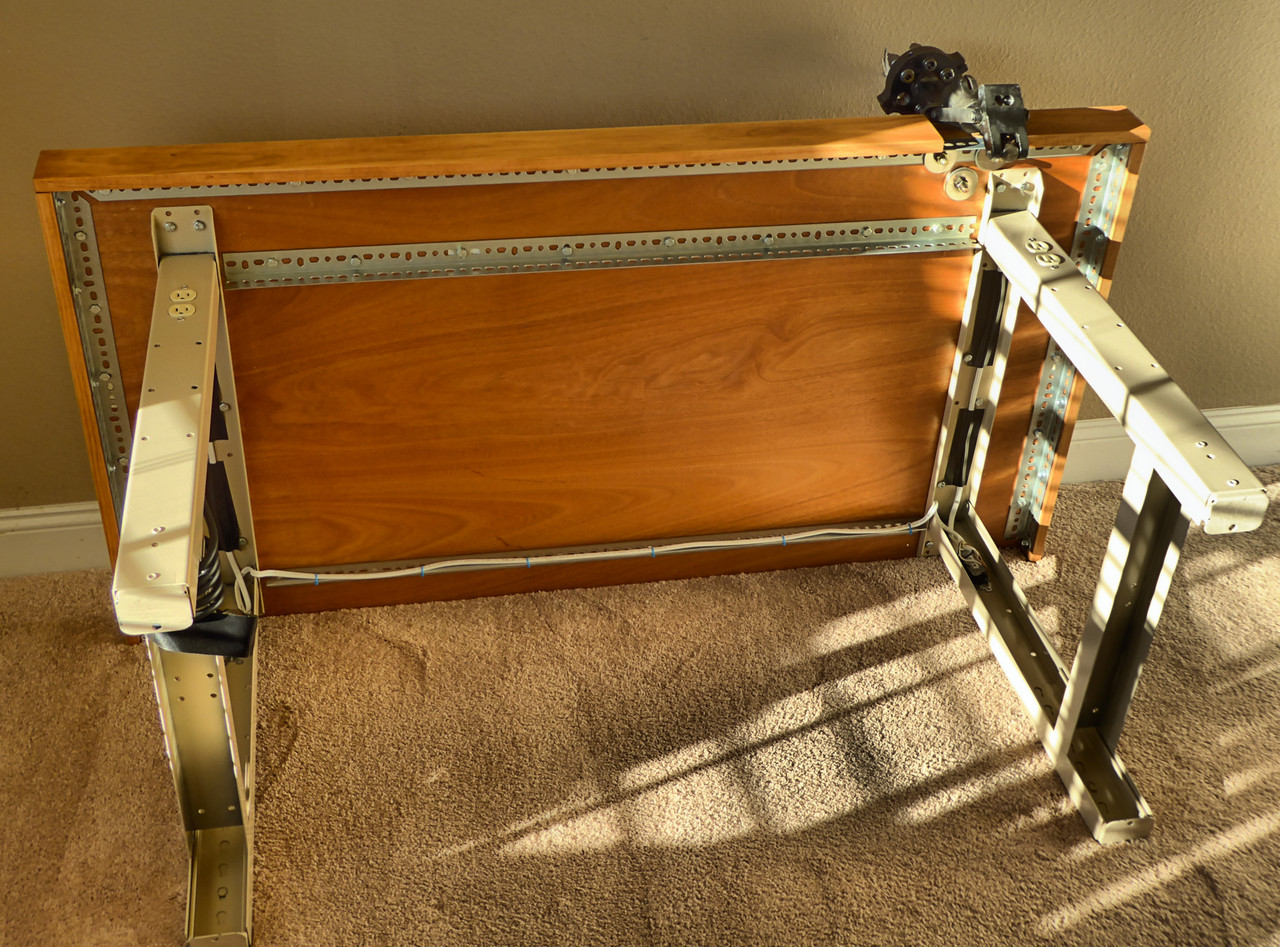
You can see the lag screws holding the steel to the top, and also the electrical outlets and the Romex wiring to connect all the outlets to the wall plug.

The view below is a close up of the attachment of the press to the top, and this is where you want the considerable force applied to the press to be spread out as much as possible. The two front bolts go though the slotted angle and then have large steel washers to spread out the force, and the back bolt has even heavier washers than the front ones. You know when you have tightened up the nuts enough when the force goes up VERY fast to the point that the wrench won't move any more!!

Image

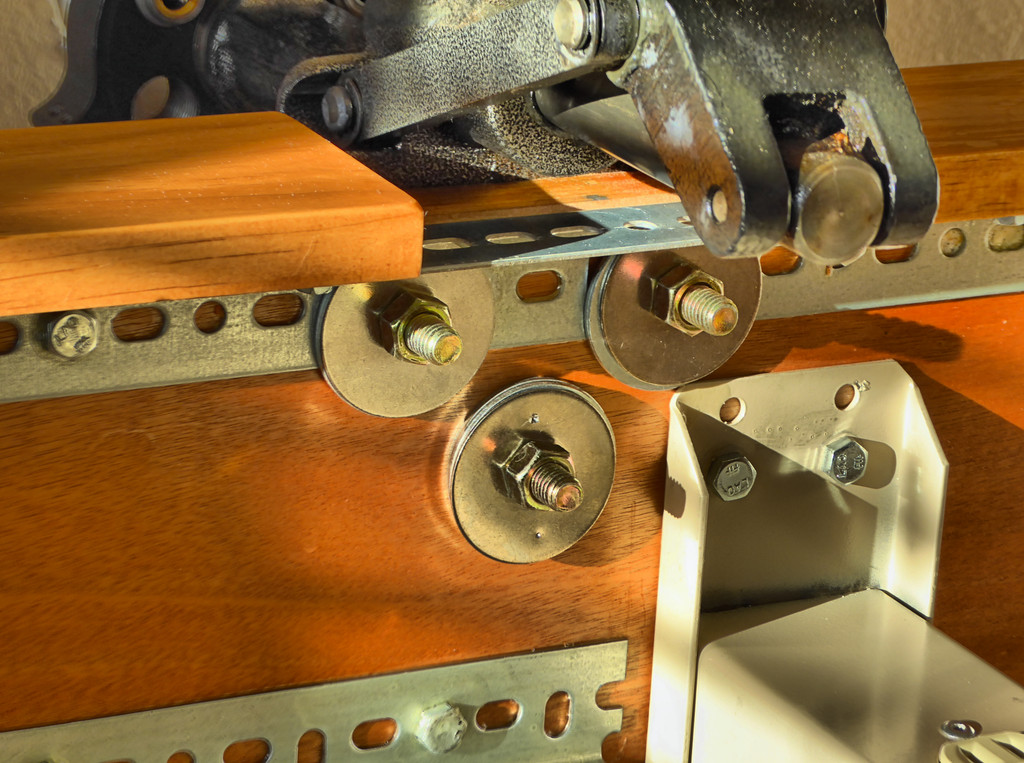
Here you can see the side lag screws holding the 1 x 4 pine sides to the steel angle, and these are #14 x 3/4" lag screws. Note that steel angle is NOT necessarily exactly a 90 degree angle, so once the steel is bolted to the top you have to use a vise grips to bend it out to a good square 90 degree angle.

Image

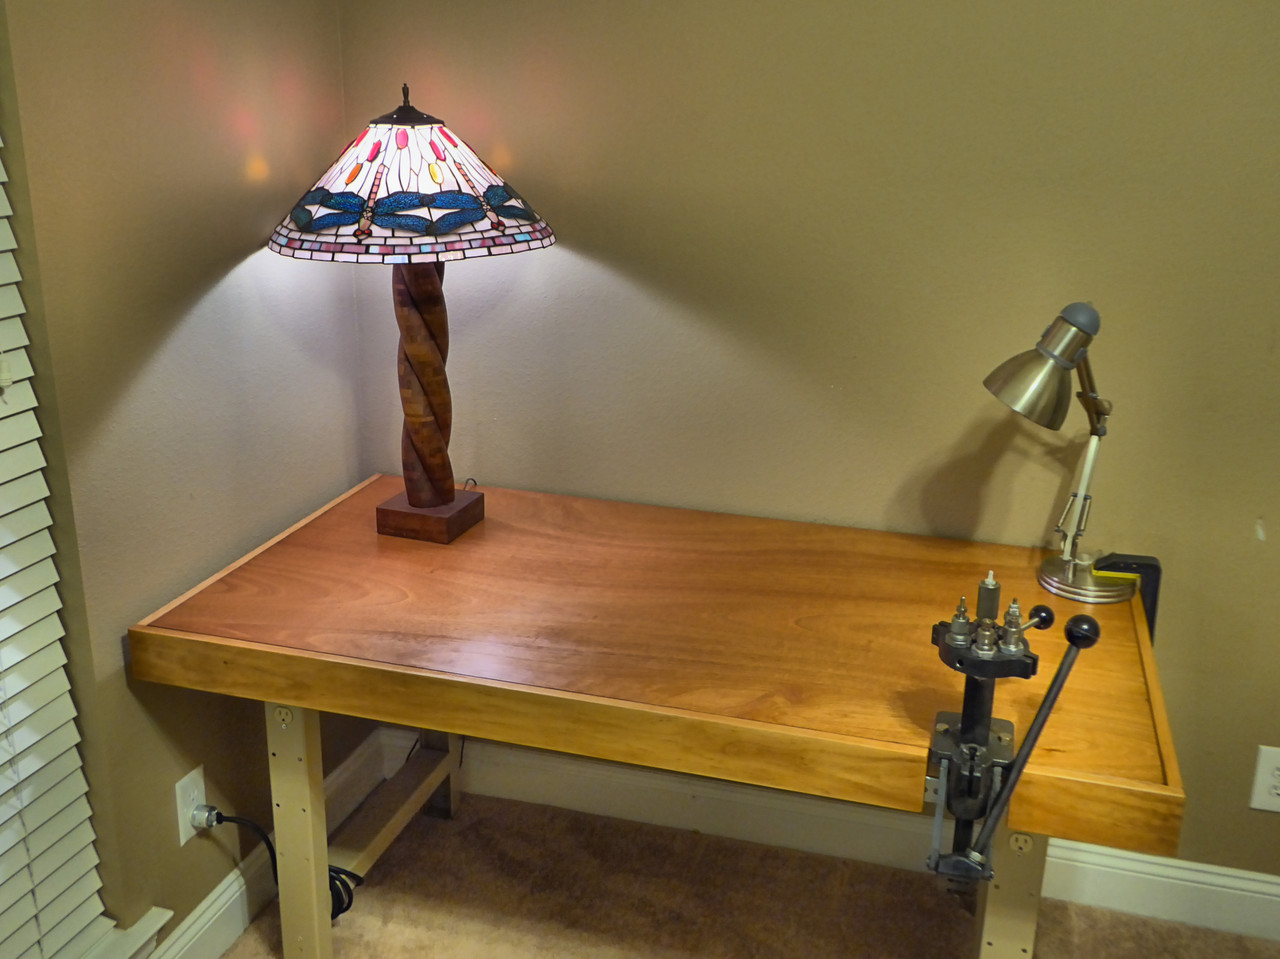
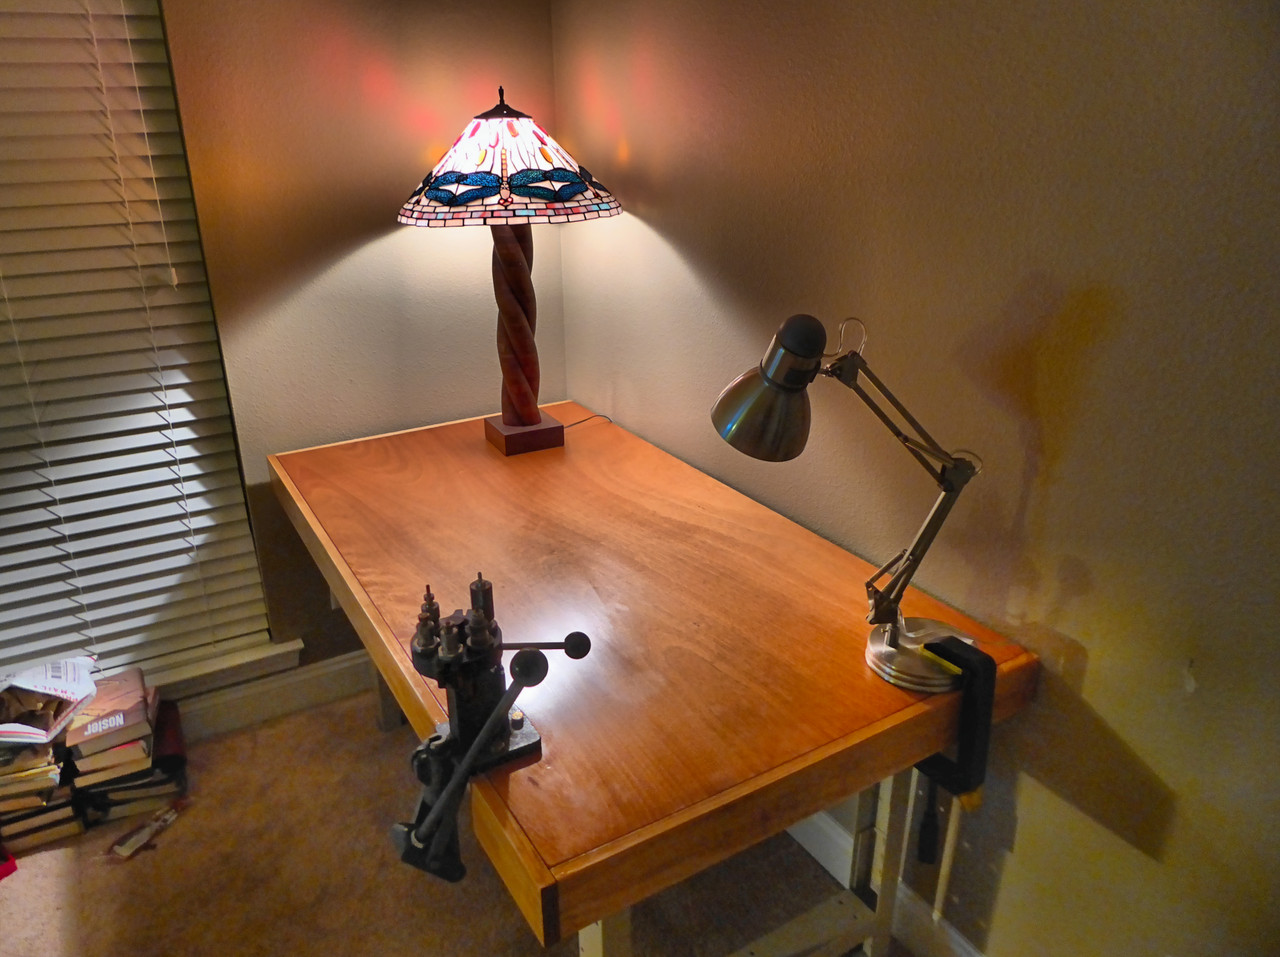
The next pictures show the finished bench, and as you can see it looks like a pretty decent piece of furniture, considering how much force it has to withstand, and also how many gun chemicals and lubricants that will get spilled on it.

Image

Image
User avatar
Seismic Sam
Gone but not forgotten
 
Posts: 5515 [View]
Joined: Fri Jul 27, 2007 1:02 pm
Location: Pass By-You, Loosianana

Built a new reloading bench

Postby gun_fan111v2 on Fri Feb 17, 2017 6:33 pm

Very nice looking bench. Where will you put the rest of your presses ;) ?
User avatar
gun_fan111v2
 
Posts: 1110 [View]
Joined: Thu Feb 19, 2015 9:31 pm

Re: Built a new reloading bench

Postby OldmanFCSA on Fri Feb 17, 2017 6:37 pm

Looks like a benchtop a NEWBIE would make.


I don't care for the electrical angle - makes it look CHEAP. And with no angle braces, you will find it will move on you. Unless you have plans to bolt to the wall.

And the back side of you electrical sockets needs a boxes over it to prevent electrical shocks to anyone handling the bench, or to protect little kids with inquizzitive little fingers.

Your trim board on front will become little sections as you mount more hardware.


Who was your instructor ???
OldmanFCSA
 
Posts: 3217 [View]
Joined: Sat Sep 24, 2011 9:55 pm
Location: Osceola, WI.

Re: Built a new reloading bench

Postby ttousi on Fri Feb 17, 2017 7:00 pm

Who was your instructor ???


:rotf:
MN Permit Instructor
http://www.tomtgun.com
NRA Training Counselor/Instructor (Pistol, Rifle, Shotgun, Personal Protection)
DNR FAS Instructor


"I am not going to be intimidated by some punk with a moderator button."-darkwolf45
User avatar
ttousi
Moderator
 
Posts: 8355 [View]
Joined: Wed Jul 25, 2007 9:14 pm
Location: St Paul

Re: Built a new reloading bench

Postby Scratch on Fri Feb 17, 2017 7:15 pm

Looks nice, but I think you'll need some cross bracing for side to side forces... I like the trim all the way around. Gives it a more "finished" look. The electrical outlets will be handy I'm sure.
01 FFL in Hudson Wisconsin
User avatar
Scratch
 
Posts: 2154 [View]
Joined: Sat Feb 12, 2011 3:23 pm
Location: Hudson, WI

Re: Built a new reloading bench

Postby Randygmn on Fri Feb 17, 2017 7:17 pm

I'd figure out a way to bolt that into the wall.
Randygmn
 
Posts: 901 [View]
Joined: Sun Dec 15, 2013 3:52 pm

Re: Built a new reloading bench

Postby BigDog58 on Fri Feb 17, 2017 9:23 pm

That's a nice bench Sam. Mine is somewhat similar. Like others, I highly suggest you lag it into your wall studs to support it. I did it to mine, and it strengthened it tremendously.
NRA RSO
"Never anger a man that can end you, from another zip code

If necessary to fight, I will Fight like I'm the 3rd Monkey on the ramp to Noah's Arc, and brother, it's starting to rain.
User avatar
BigDog58
 
Posts: 2680 [View]
Joined: Wed Jan 09, 2013 2:03 am
Location: Edina, MN

Re: Built a new reloading bench

Postby Holland&Holland on Fri Feb 17, 2017 10:41 pm

Seriously, RTFM. ;)
User avatar
Holland&Holland
 
Posts: 12505 [View]
Joined: Mon Jan 12, 2009 9:17 am

Re: Built a new reloading bench

Postby Seismic Sam on Fri Feb 17, 2017 11:08 pm

Gee guys, I don't know what to say. My old bench was made of Unistrut bolted together on 4 sides, with a leg on each corner, and at the base there were horizontal members on the sides and the back to tie the legs together on the bottom. The 2x12's were held in place against the Unistrut with less than a dozen screws and lag bolts, and some full ammo cans on the floor helped hold the base in place. The only photo I can unearth is this one of my50 GI lying on the edge of the bench:

Image

Now the fact of the mater is that I never moved on to progressive presses where you are pulling the handle up and down as fast as you can go, and maybe if I had gone that route I would have felt a need to bolt the whole thing to the wall. This new bench is a damn sight sturdier than the old one was, so I doubt I'm going to have any problems now that I didn't have for the last 40+ years.
User avatar
Seismic Sam
Gone but not forgotten
 
Posts: 5515 [View]
Joined: Fri Jul 27, 2007 1:02 pm
Location: Pass By-You, Loosianana

Re: Built a new reloading bench

Postby wasfuzz on Fri Feb 17, 2017 11:26 pm

I think someone should have gotten a Construction manual and read it front to back before attempting that build! ;)
ONE* Training LLC - Mapleton, MN
Offering Training in;
NRA Basic Pistol
MN DPS/ BCA Approved Conceal Carry
WI,IA Conceal Carry
NRA LE Firearms Instructor & LEO HR 218 Training
MN DNR Hunter Safety
ASP Expandable Baton
User avatar
wasfuzz
 
Posts: 777 [View]
Joined: Sun Oct 23, 2011 7:20 pm
Location: way down south on the Maple River

Re: Built a new reloading bench

Postby BigDog58 on Sat Feb 18, 2017 1:28 am

wasfuzz wrote:I think someone should have gotten a Construction manual and read it front to back before attempting that build! ;)


Maybe OldmanFCSA should send him a Manual "RTFM" :hammer:
NRA RSO
"Never anger a man that can end you, from another zip code

If necessary to fight, I will Fight like I'm the 3rd Monkey on the ramp to Noah's Arc, and brother, it's starting to rain.
User avatar
BigDog58
 
Posts: 2680 [View]
Joined: Wed Jan 09, 2013 2:03 am
Location: Edina, MN

Re: Built a new reloading bench

Postby MJY65 on Sat Feb 18, 2017 6:00 am

OldmanFCSA wrote:And the back side of you electrical sockets needs a boxes over it to prevent electrical shocks to anyone handling the bench, or to protect little kids with inquizzitive little fingers.


I agree with covering the connections. Not an electrician, but I don't think NM is the best choice for exposed wiring. Stranded conductors are preferred where any potential flexing could occur.
MJY65
 
Posts: 1068 [View]
Joined: Sun Feb 03, 2013 7:35 am

Re: Built a new reloading bench

Postby Seismic Sam on Sat Feb 18, 2017 11:01 am

The connections ARE covered. The side conductor screws were removed, and then the entire perhipery of the plug was wrapped with electrical tape all the way around. The wires go in the back holes that are maybe 1mm in diameter, and you would need a metal probe that diameter just to get to one of the conductors. There is NO bare wire exposed (except for the ground) anywhere on the bench.
User avatar
Seismic Sam
Gone but not forgotten
 
Posts: 5515 [View]
Joined: Fri Jul 27, 2007 1:02 pm
Location: Pass By-You, Loosianana

Re: Built a new reloading bench

Postby Erud on Sat Feb 18, 2017 12:06 pm

In for the post-electrical/smokeless powder fire pics! ;)
User avatar
Erud
 
Posts: 2503 [View]
Joined: Tue Jul 31, 2007 6:31 am
Location: SE Metro

Re: Built a new reloading bench

Postby Seismic Sam on Sat Feb 18, 2017 1:34 pm

Erud wrote:In for the post-electrical/smokeless powder fire pics! ;)


Is your Prometheus powder measure 110 V, and is it sitting on YOUR reloading bench??
User avatar
Seismic Sam
Gone but not forgotten
 
Posts: 5515 [View]
Joined: Fri Jul 27, 2007 1:02 pm
Location: Pass By-You, Loosianana

Next

Return to Ammunition & Reloading

Who is online

Users browsing this forum: No registered users and 4 guests

cron