My first AK build

Gun related chat that doesn't fit in another forum

My first AK build

Postby Scratch on Tue May 17, 2011 1:36 pm

I found someone who had a couple parts kits at a real good price so I bought them. I figured I'd start a build thread. I know some of these pics might be somewhere else on this forum, but I thought I should put them all in one place for this build thread.
The guy told me one of them was an old rusty Romy G kit. It's a little rusty but it cleaned up....OK... These first few pics are as I brought it home, before I started to clean it up.
Image

I actually thought there would be more rust the way he talked on the phone. The Barrel looked real bad at first but I cleaned it up and now it doesn't look "so" bad...Image

The dust cover is pretty bad also, but I know I can clean that up, and I don’t think it’s vital that it’s perfect anyways.
Image

The cleaning kit trap door is rusted really bad, but oh well… I've already found a replacement.
The Bolt and bolt carrier have a little rust, and both are barely pitted, but not much.
Image
Image

The rear sight block is also pretty rusted, but not pitted so I’m not worried about that
either.
Image
Image

The only part that had me worried was the barrel. At least it does have a nice clean bore.

I was going to buy a pre bent and hardened receiver for it, but I had some time so I ended up not going that route.
Last edited by Scratch on Tue May 17, 2011 1:39 pm, edited 1 time in total.
01 FFL in Hudson Wisconsin
User avatar
Scratch
 
Posts: 2170 [View]
Joined: Sat Feb 12, 2011 3:23 pm
Location: Hudson, WI

Re: My first AK build

Postby Scratch on Tue May 17, 2011 1:39 pm

Like I said, I was going to buy a Nodak receiver for this, and considering they sell their basic one for 55 bucks, I probably should have, but I've needed a heavy duty brake for a while so decided to build this one modeled after the one that Ray Delashmutt sells (search YouTube for AK47 bending jig) I like his design, and how quick it is compared to the press. I already have a press, but like I said, I could use a small brake so this is what I built:
Image


I talked to Ray, and bought a bunch of stuff from him (922r parts, springs, mags, etc...) and some of his Tapco flats with rails already installed. When I got them, I decided to make some "test" flats to bend in my new brake, to get all the measurements figured out before I bent up the Tapco one. Mine is on top:
Image


After a bunch of trial and errors on more “test” pieces, I got the brake all dialed in and working great! Here is a mockup still with the test receiver.
Image

Then I got brave enough to bend the Tapco one. All went well. I’m very happy with the results.
Image
Image
Image

Everthing fits in there great. Now I need to heat treat the FCG holes. This is what I’m planning, tell me if it sounds right…

Using an oxy/acet torch and a welding tip, heat up one hole at a time until its red hot, almost yellow, then quickly quench in oil. I’m a little scared to heat too much and it starts to destroy the hole, but I’ll have to be very careful.

Do the same for all the other 3 holes.


Then clean up all the mill scale that has come from the heat with a wire brush and use the same torch to heat up the holes again to a dark grey color, about 800F I think. Then let air cool. Should I again do one hole at a time, waiting for each hole to cool?

That’s it right? And just the 4 holes right?
01 FFL in Hudson Wisconsin
User avatar
Scratch
 
Posts: 2170 [View]
Joined: Sat Feb 12, 2011 3:23 pm
Location: Hudson, WI

Re: My first AK build

Postby Scratch on Tue May 17, 2011 1:42 pm

I also cleaned up and refinished the furniture. (there's another kit in there) I was going to go glossy, but I kinda like the "aged" look of them. This is tung oil, they are Uber smooth to the touch!
Image
01 FFL in Hudson Wisconsin
User avatar
Scratch
 
Posts: 2170 [View]
Joined: Sat Feb 12, 2011 3:23 pm
Location: Hudson, WI

Re: My first AK build

Postby Joe Camo on Tue May 17, 2011 3:34 pm

Lookin' good so far!

JC
"Let us speak courteously, deal fairly, and keep ourselves armed and ready." Theodore Roosevelt
User avatar
Joe Camo
 
Posts: 249 [View]
Joined: Mon Feb 15, 2010 12:27 pm
Location: Wright Co.

Re: My first AK build

Postby Squib Joe on Tue May 17, 2011 4:12 pm

Rivets are the hard part (to me anyway), but you got a good start.
"The weight is a sign of reliability. I always go for reliability." - Boris "The Blade" Yurinov
User avatar
Squib Joe
 
Posts: 2778 [View]
Joined: Tue Aug 07, 2007 8:15 pm
Location: Minneapolis

Re: My first AK build

Postby Norsesmithy on Tue May 17, 2011 4:33 pm

Remember to keep an eye on your parts count (922r).

A handy little tool:http://jobson.us/922r/
Norsesmithy
 
Posts: 1359 [View]
Joined: Thu Nov 05, 2009 11:16 pm
Location: By Delano

Re: My first AK build

Postby spliznat on Tue May 17, 2011 6:48 pm

Ditch the stock trigger and get a Tapco G2......... awesome
"Grandpa, were you a hero in the war?" Grandpa said, "No... but I served in a company of heroes".
Major Richard Winters
User avatar
spliznat
 
Posts: 151 [View]
Joined: Mon Jan 10, 2011 1:33 am
Location: Woodbury,MN

Re: My first AK build

Postby Norsesmithy on Tue May 17, 2011 7:58 pm

Sounds like he already did.
Norsesmithy
 
Posts: 1359 [View]
Joined: Thu Nov 05, 2009 11:16 pm
Location: By Delano

Re: My first AK build

Postby forcefed on Tue May 17, 2011 8:16 pm

Looking good! I still have to press the gas block on the AK that I am doing now.
User avatar
forcefed
 
Posts: 741 [View]
Joined: Sat Feb 27, 2010 2:40 pm
Location: East Bethel

Re: My first AK build

Postby Scratch on Tue May 17, 2011 8:33 pm

Yes... I know about 922 and will be compliant, and I already have the G2.
01 FFL in Hudson Wisconsin
User avatar
Scratch
 
Posts: 2170 [View]
Joined: Sat Feb 12, 2011 3:23 pm
Location: Hudson, WI

Re: My first AK build

Postby Scratch on Wed May 18, 2011 2:46 pm

So I heat treated my receiver today. I waaaay overthought this. It was so simple, it’s scary. I was confident on hardening, but was worried about tempering. Hardening was easy. I knew I had to get it to non-magnetic, so I heated another piece of steel the same thickness (one of those test receivers) until a magnet wouldn’t stick and noted the color.

Red hot…. Took about 10 seconds per hole, and quenched in oil.

Seriously, the worse part about this was cleaning up all the spilt oil…
Image

Then I cleaned up all the scale so I could see the colors for tempering.
Image


I was worried about the tempering though. I’ve heard I need to heat it to 300, 425, 450, 550, 600, 700, and 800 degrees. The internet is full of “experts” huh. One thing thatI read alot was to heat it to a blue or grey. That seems to be anywhere from 600 to 800. At least I had it narrowed down a bit.
My home oven goes to 500 so I thought even if I got to 500, I’d probably be ok, so I fired up the stove and let it pre-heat for about half an hour, then put it in for about 45 minutes. I figured it was probably at about 500 by then but just to heat things up a bit more, as I took it out, I spot heated it with a propane torch. I figured that had to get it up another 50-100 degrees or so. I hope that did it.

Anyways I let it cool and now it looks all black and scary…. I peed my pants in excitement… just a little…
Image

Next up is the center pin, then I think I’m gonna make some sort of trigger guard rivet jig…

On the Center pin… I’ve heard put the factory flat side on the safety lever side, but
I’ve also heard to put the formed side on that side so the safety will hide any imperfections… What do you think?
01 FFL in Hudson Wisconsin
User avatar
Scratch
 
Posts: 2170 [View]
Joined: Sat Feb 12, 2011 3:23 pm
Location: Hudson, WI

Re: My first AK build

Postby plink on Thu May 19, 2011 12:52 pm

:yippee: Keep the updates coming.
plink
 
Posts: 315 [View]
Joined: Wed Dec 01, 2010 1:35 pm
Location: Burbs of the west

Re: My first AK build

Postby farmerj on Thu May 19, 2011 1:02 pm

go down to northern tool or else to Harbor Freight and pick up one of those cheap infra-red thermometers. Considering what you are trying to do, worth the coin.

http://www.northerntool.com/shop/tools/ ... _200395566
We reap what we sow. In our case, we have sown our government.
Current moon phase
User avatar
farmerj
 
Posts: 4802 [View]
Joined: Fri Aug 10, 2007 9:11 am
Location: The edge of the universe in the vertex of time on the space continuum of confusion

Re: My first AK build

Postby Scratch on Wed Jun 29, 2011 7:45 pm

Wow this build is taking a long time isn’t it! I see some builds get done in hours, not mine. I like to slow things down a bit, think of all the different possible ways to accomplish something, then not do the easy ones, but do the ones that take the longest time, and using the tools I don’t have. Yep, that’s me. Now I’ve decided to see how inexpensive I can do it. Seeing as I got this kit for pretty cheap, I’m keeping a running total of how much it costs to build.

So I decided to go with the rivet gun method of riveting. I know, I already have a press, but then I gotta make or buy all those jigs for them and I really think the rivet gun thing is faster and it looks easier… “looks” easier… plus it make lots of noise and scares my dog which is always funny.

Well it turns out, it is pretty easy. And if you didn’t have a press, it might be cheaper too. Figure you can get a cheap press for 50 bucks or so, but then you gotta store it, plus the jigs with a press would be more expensive to buy than the bucking bars with the rivet gun. Yes you can use it for other stuff like barrel removal and install, but I’m gonna try not to use the press there either.
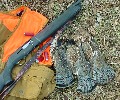
I got this 4X aircraft rivet gun off ebay for about 80 bucks. Then I had a standard air hammer punch modified to fit the rivet heads. This thing has so much more power than a standard air hammer. I didn’t even realize these things existed! I already have plans for it using it, to texture metal for some of my metal art. I’ve used air hammers before but they don’t have the oomph…
Image

I tried a few practice rivets with it and it seems to work very quickly and is easy to control. This rivet took about 3 seconds to complete.
Image

Using a modified railroad spike in a vise, I set the trigger guard rivets. In this pic the rivet heads look like they have a flat top, but they don't.
Image

Here’s the inside view of those rivets.
Image

Going with my “no press used” theme, I was going to buy or rent one of those Auto Zone steering pump pulley removers, but thought I could build one pretty easily so I did.
Image

Here’s with the barrel in the puller.
Image

I also used a hammer and punch to remove the barrel pin. No press needed right…

Before I pull the barrel, I want to check headspace. Then I’ll pull the barrel, and take more pics of the riveting. I want to do the rear trunion rivets last to get more practice since I’ve heard those are the hardest ones to do.

I've heard to use nickels and pennies, will either one work fine?
01 FFL in Hudson Wisconsin
User avatar
Scratch
 
Posts: 2170 [View]
Joined: Sat Feb 12, 2011 3:23 pm
Location: Hudson, WI

Re: My first AK build

Postby chopper on Wed Jun 29, 2011 8:28 pm

Looking good steve
chopper
 
Posts: 338 [View]
Joined: Thu Oct 29, 2009 7:40 pm
Location: North of twin cities

Next

Return to General Gun Chat

Who is online

Users browsing this forum: No registered users and 6 guests

cron